Skip to content

Creating a reactive SPA simply within an ASP.Net Core web app with Vue.js

2021-07-12

In this post, I will cover how you can quickly and easily use Vue.js to make a reactive 'SPA' within ASP.Net Core. This is a slightly dirty way to do things, but for rapid prototyping or a simple project it does the job just fine without any unnecessary complications. By 'SPA' I mean a Single Page Application, except without any navigation as that's handled by the underlying ASP.Net Core application, as is the API called by Vue.js methods.

In the <head> tags of your Razor page/view, you'll need to include a reference to Vue.js, for example via a CDN.

<script src="https://cdn.jsdelivr.net/npm/[email protected]/dist/vue.js"></script>

At the bottom of your Razor page/view, you'll need to include a <script> tag to hold your Vue instance definition. In Vue.js this includes:

  • the element to have the Vue instance applied to
  • the data object including any default properties
  • computed properties (these act as if part of the data object but reactively update like functions)
  • methods (functions that can interact with the data object)

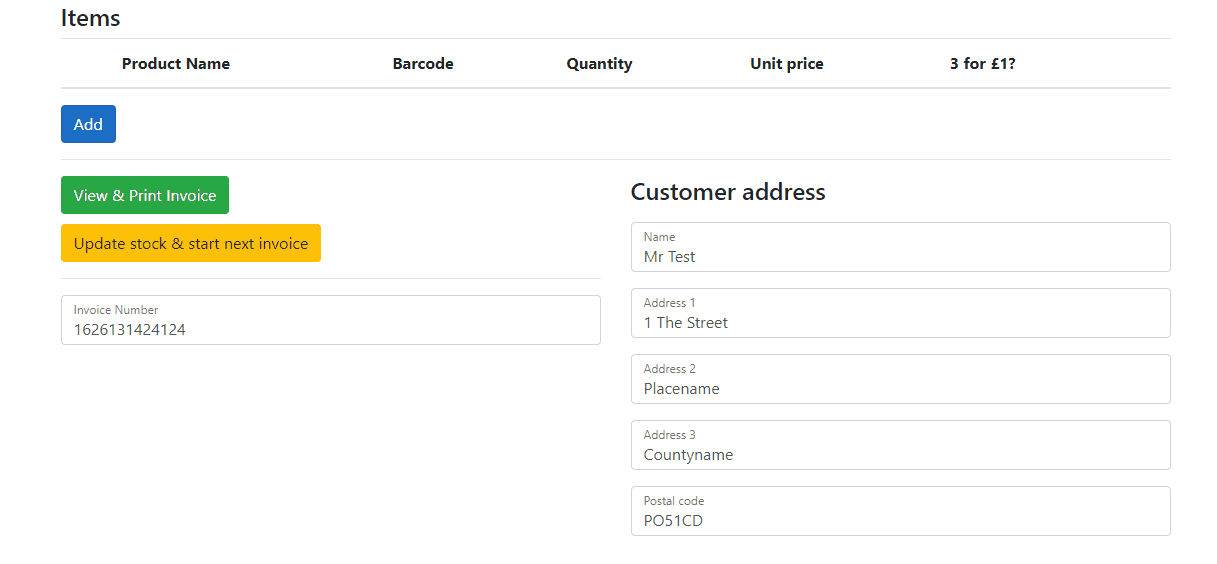
In this example, it's a Vue instance for creating invoices and updating stock levels. The above gif shows some of the functionality achieved with this, including dynamically adding classes, and looping through elements in an array with markup for each.

<script>
    const createInvoice = new Vue({
        el: '#create-invoice',
        data() {
            return {
                errorMessage: '',
                customer: {
                    Name: '',
                    Address1: '',
                    Address2: '',
                    Address3: '',
                    PostCode: ''
                },
                invoiceNumber: new Date().valueOf(),
                products: [],
                successMessage: ''
            };
        },
        computed: {
            calculatedVat() {
                // take total and get 20% of it
                return this.total * 0.2;
            },
            subTotal() {
                // Take total and get 80% of it
                return this.total * 0.8;
            },
            total() {
                // For each product, add total price
                let total = 0;
                this.products.forEach(product => {
                    total += product.totalPrice;
                });

                return total - this.promoDiscount;
            },
        },
        methods: {
            calculateItemTotal(product) {
                const totalPrice = product.unitPrice * product.quantity;
                Vue.set(product, 'totalPrice', totalPrice)
            },
            getDuplicateBarcodeClass(product) {
                const matchingBarcodes = this.products.filter(obj => {
                    return obj.barcode === product.barcode;
                })

                if (matchingBarcodes.length > 1) {
                    return 'alert-danger';
                }
            },
            removeProduct(product) {
                const index = this.products.findIndex(
                    (x) => x.barcode === product.barcode
                );

                if (index > -1) {
                    this.products.splice(index, 1);
                }
            },
            updateStock() {
                // Check the user really wants to update the stock and start a new invoice
                const userResponse = confirm("Are you sure you wish to finish this invoice and update stock levels? You will not be able to print it again.");
                if (userResponse) {
                    const data = {
                        invoiceNumber: String(this.invoiceNumber),
                        products: this.products,
                    };

                    // Update the stock & log the invoice
                    fetch(`Invoices/UpdateStockAndLogInvoice/`, {
                        method: "POST",
                        headers: {
                            "Content-Type": "application/json",
                        },
                        body: JSON.stringify(data),
                    })
                        .then((response) => {
                            return response.json();
                        })
                        .then((data) => {
                            if (data.statusCode === 404) {
                                Vue.set(this, "errorMessage", data.message);
                            } else {
                                Vue.set(this, 'successMessage', data.message);

                                // If no errors, clear the products list to be ready for the next invoice
                                Vue.set(this, "products", []);
                            }
                        })
                        .catch((err) => {
                            console.error(err);
                            Vue.set(this, "errorMessage", err);
                        });
                }
            },
            validateNumber: (event) => {
                // Only accept integers, so prevent anything but digits 0-9
                let keyCode = event.keyCode;
                if (keyCode < 48 || keyCode > 57) {
                    event.preventDefault();
                }
            },
            viewAndPrintInvoice() {
                if (this.isDuplicateBarcode) {
                    alert("There is a duplicate barcode - look for red barcodes and remove duplicates");
                }
                else {
                    window.print();
                }
            }
        },
    });
</script>

To hook this into the DOM, just add the element identifier to an element, for example <div id="create-invoice"> will bind a div to this Vue instance.

Within that, you are free to use a variety of tools, like v-if, interpolation and v-on event handlers. In this example, if there's any text in the successMessage property of the Vue data object, this alert div will be displayed, interpolating the message, and clearing it (thus hiding the alert) when the close button is clicked.

1
2
3
4
5
6
7
<div v-if="successMessage" class="alert alert-success alert-dismissible fade show" role="alert">
    <i class="bi bi-check-circle-fill"></i>
    <strong>Success:</strong> {{ successMessage }}
    <button type="button" class="close" aria-label="Close" v-on:click="successMessage = ''">
        <span aria-hidden="true">&times;</span>
    </button>
</div>

In this example, a v-for is used to loop through all the products in the array, producing a <tr> for each of them, with an appropriate class bound from a method taking that product as a parameter. v-if and v-else statements enable conditionally showing one (or none) of three different pooltips. The product's name property is interpolated and shown, as is the unitPrice property, which is nicely formatted for readability.

The barcode field is mapped to a v-model, which means as it changes it directly alters the value in the Vue data object, and as that changes this updates reactively. It also makes use of v-on:blur to run a method that makes an API call to retrieve product data, conditionally sets the disabled property once a barcode has been entered, and binds a class based on the output of a method taking the product as a parameter.

The quantity field also uses a v-model, but specifically forces it to be a number (no need for Typescript here) runs a method on keypress (the @@ syntax is purely due to Razor escaping, normally you'd only need one) and on change.

<tr v-for="product in products" v-bind:class="getProductRowClass(product)">
    <td>
        <div class="tooltip" v-if="product.barcode.length > 0 && product.stockLevel - product.quantity < 0">
            <i class="bi bi-x-circle-fill text-danger"></i>
            <span class="tooltiptext">You will need to order more stock to fulfill this order</span>
        </div>
        <div class="tooltip" v-else-if="product.barcode.length > 0 && product.stockLevel - product.quantity == 0">
            <i class="bi bi-exclamation-triangle-fill text-warning"></i>
            <span class="tooltiptext">You will run out of stock</span>
        </div>
        <div class="tooltip" v-else-if="product.barcode.length > 0 && product.stockLevel - product.quantity <= 10">
            <i class="bi bi-info-circle-fill text-info"></i>
            <span class="tooltiptext">Stock will be low after this order</span>
        </div>
    </td>
    <td>
        <label>{{product.name}}</label>
    </td>
    <td>
        <input type="text" name="barcode" v-model="product.barcode" v-on:blur="getProductInformation(product)" :disabled="product.barcode.length > 0" v-bind:class="getDuplicateBarcodeClass(product)">
    </td>
    <td>
        <input type="number" step="1" name="quantity" v-model.number="product.quantity" @@keypress="validateNumber" v-on:change="calculateItemTotal(product)">
    </td>
    <td>
        <label>&#163;{{parseFloat(product.unitPrice).toFixed(2)}}</label>
    </td>
</tr>

This is a very simple, quick and dirty example, but hopefully it gives you an idea of the kind of things you can quickly and easily achieve using Vue.js in this way. While this example uses ASP.Net Core, you could easily plug this into any other website, so long as it's using HTML, CSS and JavaScript, and there is an API to make requests to.